
Delicious Flavor-Packed Walking Taco Bake Recipe to Wow Your Taste Buds
THE SENSORY HOOK
Imagine the sound of crispy corn chips crunching under the weight of rich, savory layers, while the aroma of seasoned beef mingles with spices that tantalize your senses. The first forkful reveals a creamy, cheesy texture, encapsulating a medley of vibrant flavors that dance across your palate. Each bite enchants with warmth and satisfaction, leaving you craving more.
THE ORIGIN & HERITAGE
Walking tacos are a beloved staple of Midwest fairs and gatherings, often nostalgic for many who grew up munching on them during summers spent at county fairs or family picnics. Inspired by the idea of a meal that travels, the Walking Taco Bake brings together all the iconic flavors of this classic dish, transformed into a hearty and filling casserole. As your Grandma might have said while stirring her legendary chili, “It’s all about layering those flavors, sweetheart.” This recipe takes that same timeless comfort and wraps it into an easy bake that everyone can enjoy.
THE SCIENCE OF FLAVOR
- Umami from Beef: Lean ground beef provides a rich umami flavor that serves as the backbone of this dish.
- Creaminess from Dairy: The addition of cream cheese and sour cream gels the components together, enhancing texture and flavor.
- Sweetness from Corn: Frozen corn adds a natural sweetness that balances out the spiciness of the taco seasoning.
- Acidity from Tomatoes: The acidity in diced tomatoes with green chilies elevates the overall flavor, cutting through richness.
- Crunch Factor: The inclusion of crushed corn chips adds varying textures, creating an enjoyable crunch in every bite.
THE INGREDIENTS:
Core Ingredients:
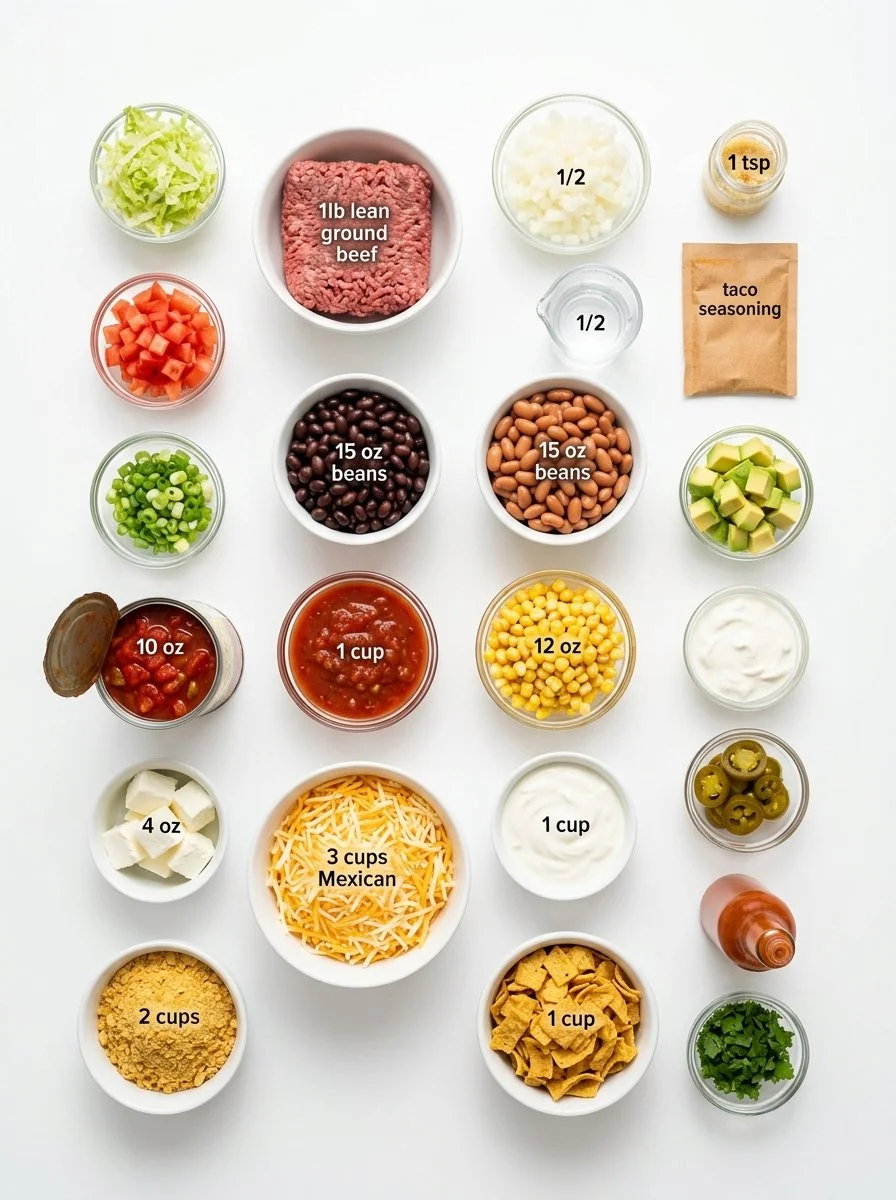
- 1 pound lean ground beef
- 1/2 yellow onion, diced
- 1 teaspoon minced garlic
- 1 (1-ounce) packet taco seasoning
- 1/2 cup water
- 1 (15-ounce) can black beans, drained and rinsed
- 1 (15-ounce) can pinto beans, drained and rinsed
- 1 (10-ounce) can diced tomatoes with green chilies (not drained)
- 1 cup chunky salsa
- 12 ounces frozen corn
- 4 ounces cream cheese, softened and cubed
- 1 cup sour cream
- 3 cups shredded Mexican cheese blend, divided
- 2 cups corn chips, crushed fine
- 1 cup corn chips, loosely crushed (for topping)
Optional toppings:
- Shredded lettuce
- Diced tomatoes
- Sliced green onions
- Diced avocado
- Extra sour cream
- Jalapeños
- Hot sauce
- Chopped cilantro
Quality Hack:
- For the ground beef, choose grass-fed for better omega-3 content.
- Opt for low-fat cream cheese to keep it lighter without sacrificing creaminess.
THE MASTERCLASS INSTRUCTIONS:

- Preheat your oven to 350°F. Spray a 9×13-inch baking dish with nonstick spray.
- In a mixing bowl, crush 2 cups of corn chips finely and set aside 1 cup of loosely crushed chips for topping.
- Using a heavy-bottomed cast iron skillet over medium-high heat, cook the ground beef and diced onion until browned and nearly done. Drain any excess grease.
- Stir in the minced garlic, cooking for another minute until fragrant.
- Add the taco seasoning and 1/2 cup of water, simmering for 1-2 minutes until slightly thickened.
- Incorporate the black beans, pinto beans, frozen corn, diced tomatoes (with the liquid), and chunky salsa, cooking for an additional 2-3 minutes.
- Lower the heat and fold in the cream cheese, stirring until melted and fully integrated. Remove from heat, then stir in sour cream and 2 cups of shredded cheese.
- Gently fold in the 2 cups of finely crushed chips into the mixture until combined.
- Pour the delicious mixture into the prepared baking dish and bake for 20 minutes.
- Remove from the oven, sprinkle the remaining 1 cup of cheese and the 1 cup of loosely crushed corn chips on top, then bake for an additional 5-7 minutes until the cheese is melted and bubbly.
- Allow to rest for 5-10 minutes before serving. Top with your favorite toppings and enjoy!
A HEALTHIER PERSPECTIVE
Looking for ways to enhance the nutritional value of your Flavor-Packed Walking Taco Bake? Here are a few tips:
- Swap sour cream for Greek yogurt for extra protein and a lighter texture.
- Add diced bell peppers or zucchini for additional fiber and nutrients.
- Use whole-grain corn chips instead of traditional varieties for a heartier crunch and more fiber.
One key ingredient to highlight is the black beans. Rich in protein and fiber, they’re a nutritious addition that aids in digestion and helps maintain stable blood sugar levels.
THE TROUBLESHOOTER
Why did it fail?
- Too watery: Ensure to drain canned beans and retain some sauce but not all.
- Dry texture: Be sure not to bake too long; keep an eye on cheese bubbles.
- Flavorless: Always taste and adjust your seasoning, starting with a pinch of salt or more taco seasoning as needed.
THE ART OF SERVING
Serve your Walking Taco Bake in colorful bowls adorned with your favorite toppings for visual appeal. Pair it with a refreshing beverage, like a chilled margarita or a tangy iced tea, and create an inviting atmosphere with bright dinnerware and ambient lighting. This dish is perfect for game days, family gatherings, or cozy nights in.
THE DIETARY LAB
Want to cater to various dietary needs? Here’s how you can adapt this dish:
- Vegan: Substitute ground beef with lentils or tempeh, and use plant-based cream cheese and dairy-free sour cream.
- Gluten-Free: Use certified gluten-free corn chips and replace any sauces with gluten-free options.
- Keto: Swap the corn with additional vegetables like cauliflower or zucchini, and omit the corn chips altogether.
STORAGE & REVIVAL:
- Yield: Serves 8-10
- Prep Time: 15 minutes
- Cook Time: 30 minutes
The Revival Rule: To reheat, place leftovers in a preheated oven at 350°F for 15-20 minutes, or use an air fryer at 325°F for 10-15 minutes. Do NOT use a microwave, as it will create a soggy texture.
MANDATORY FAQ
What can I use instead of ground beef?
Lean turkey or seasoned lentils work fantastic!
Can I make this ahead of time?
Absolutely—assemble it ahead and refrigerate before baking for up to 24 hours.
Is it possible to freeze the Walking Taco Bake?
Yes, store in an airtight container and freeze for up to 3 months.
What other beans can I use?
Kidney beans or chickpeas can be great substitutes!
How do I prevent my cheese from burning?
Cover the dish with foil until the last few minutes of baking.
Can I use fresh vegetables instead of frozen?
Certainly! Just make sure they’re properly chopped and pre-cooked if necessary.
How long can this dish stay in the fridge?
A maximum of 3-4 days when stored correctly.
Can I use homemade salsa?
Yes, fresh salsa elevates the flavor beautifully!
What do I serve this with?
It’s great alongside a simple salad or fresh guacamole.
Can I use a different cheese blend?
Feel free to experiment with cheddar, pepper jack, or mozzarella!

THE FINAL BITE
I hope you enjoy creating this Flavor-Packed Walking Taco Bake as much as I do! Feel free to leave a comment below if you tried the recipe! For more delicious ideas, check out our Mexican Chicken Casserole, Cheesy Taco Soup, or Tex-Mex Stuffed Peppers. Happy cooking!

Flavor-Packed Walking Taco Bake
Ingredients
Method
- Preheat your oven to 350°F (175°C). Spray a 9x13-inch baking dish with nonstick spray.
- In a mixing bowl, crush 2 cups of corn chips finely and set aside 1 cup of loosely crushed chips for topping.
- Using a heavy-bottomed cast iron skillet over medium-high heat, cook the ground beef and diced onion until browned and nearly done. Drain any excess grease.
- Stir in the minced garlic, cooking for another minute until fragrant.
- Add the taco seasoning and 1/2 cup of water, simmering for 1-2 minutes until slightly thickened.
- Incorporate the black beans, pinto beans, frozen corn, diced tomatoes (with the liquid), and chunky salsa, cooking for an additional 2-3 minutes.
- Lower the heat and fold in the cream cheese, stirring until melted and fully integrated. Remove from heat, then stir in sour cream and 2 cups of shredded cheese.
- Gently fold in the 2 cups of finely crushed chips into the mixture until combined.
- Pour the delicious mixture into the prepared baking dish and bake for 20 minutes.
- Remove from the oven, sprinkle the remaining 1 cup of cheese and the 1 cup of loosely crushed corn chips on top, then bake for an additional 5-7 minutes until the cheese is melted and bubbly.
- Allow to rest for 5-10 minutes before serving. Top with your favorite toppings and enjoy!